Contents
Support Managers
|
Xartashah
English
| online |
|
Aerielle Kiyori
English
| offline |
|
Amyalka
English
| offline |
|
Glaznah Gassner
English, Russian
| offline |
|
Makaylah Wurgle
English
| offline |
|
NealB
English, Hindi
| offline |
|
Rehnaeaislinn
English
| offline |
|
Sammyredfire
English
| offline |
|
TwixiChardonnay
English
| offline |
| show offline managers | |
| English, Hindi, Russian |
Scheduled notices setup
Scheduled notices setup
Overview
Scheduled notices allows your bot to send out automatic notices for specific dates and time (SLT)
There are two types of scheduled:
- One-time notice
- Repeating/Periodic notice
To setup one-time/periodic messages for your Advanced Notices add-on, navigate to your Calendar Messages from your add-on page and click "Schedule new notice"
Click the according tabs below to read the instructions for creating each message type
- One-time notice
- Periodic notice
Creating One-Time Notice
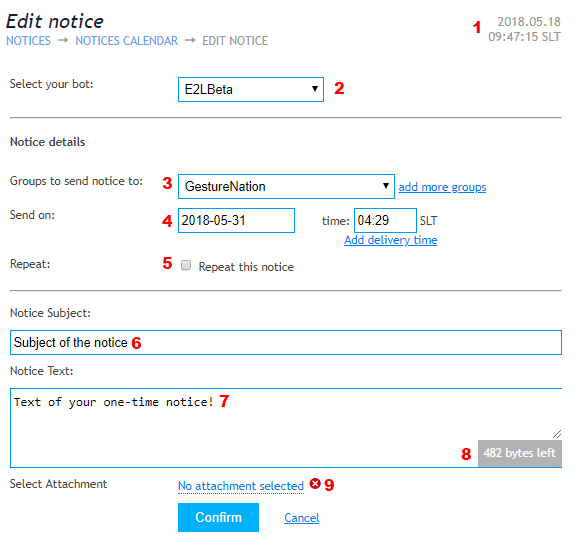
- Current time: Displays live current date and time in Second Life
- Select your bot: Choose which personal bot is the sender of the notice
- Send group notice to: Allows you to select the SL group(s) to send notice to
- Send on and time: Select the date and time (SLT) for notice to be sent on.
- Repeat this notice: This option converts your one-time notice into periodic (leave blank if notice is intended for one-time sending)
- Notice subject: This is the subject/title of your notice.
- Notice text: This is a text of your one time notice
- Byte Count: Displays maximum length of your notice text.
- Select attachment: Opens an Inventory Browser of your bot to select an object you want as the notice attachment
Creating Periodic Notice

- Select your bot: Choose which Personal Bot is the sender of the notice
- Send group notice to: Allows you to select the SL group(s) to send notice to
- Send on: Select the calendar date of first notice delivery.
- Time: Select the delivery time (SLT) of your notice
- Repeat this notice: This option converts your one-time notice into periodic (leave blank if notice is intended for one-time sending)
- Daily: Allows you to schedule notice delivery to specific amount of days (daily)
- Weekdays: Allows to send notice only on specific weekdays
- Custom: Allows to send notices on custom schedule, read more here
- Every: Send message on every inserted value (1 day - everyday, 2 days - every 2nd day, etc)
- End on: You can select the ending date of your notice here. Leave it blank if you want notice to be periodic permanently.
- Notice subject: This is the subject/title of your notice.
- Notice text: This is a text of your one time notice
- Byte Count: Displays maximum length of your notice text.
- Select attachment: Opens an Inventory Browser of your bot to select an object you want as the notice attachment
Notice Calendar
Notice Calendar allows you to keep track of your notice schedule to see on which dates of the month your notices are scheduled to be sent out.

Editing/removing scheduled notices
Clicking on each date of the calendar will display the list of your scheduled notices for the selected date.
To remove/edit the notice:
- Click the specific date on the calendar
- Hover your mouse over top-right corner of the notice
- The menu of following option will appear:
- Edit notice: Takes you to notice editor
- This occurrence only (remove): Removes the notice for the specified date only
- WHOLE sequence (remove): Removes the entire periodic notice
